Bitwise – Terminal based bit manipulator

I Recently complete a basic ncurses based terminal application for minglinng with bits.
I’m working low level most of the times and need to tinker with bits, masks and to translate between number bases (hex to dec, and vice verse).

As I’m working 99% of my time in a terminal, I found it very annoying to open the calculator application in Windows or KDE, so I decided to create a small app that I can use in the terminal window.

Well, here it is.

bitwise

https://github.com/mellowcandle/bitwise

If you like it, please star it on Github.

Thanks and goodbye.

Bitwise – Terminal based bit manipulator

Automatically placing Gerrit’s commit-msg hook in every new git repository

Sadly, when cloning a repository from Gerrit. the Gerrit’s commit-msg hook is not populated in the local repository git hooks folder.

Here’s a neat trick that I just learned that always puts that there.

scp -p -P 29418 <GERRIT_SERVER>:hooks/commit-msg ./
sudo mv ./commit-msg /usr/share/git-core/templates/hooks/

Hope you find it useful…

Automatically placing Gerrit’s commit-msg hook in every new git repository

git pre-commit hook for code beautification

Hi.

In this post I will share a git pre-commit hook I created for aiding with code beautification.

In Linux, I work in two different coding styles: User space and Kernel.

The Linux kernel has a very specific coding style and every commit to kernel must adhere to that style.
The Linux kernel provides a very neat script named checkpatch.pl that can be used to check if your patch adheres to the kernel style. It also works on complete files.

Usually, before I prepare an a patch for pushing upstream, I run the checkpatch script and fix all the errors (well, not all off them, 80 columns ? really ??)

but, can’t we automate this ? well, here’s come git hooks to the rescue.

Git has an option of providing a scripts that can run before or after certain workflow stages.
For instance, if you ever worked with Gerrit, you probably used Gerrit’s commit-msg hook provided to generate a unique Change-Id token embedded in the commit message.

One hook that is particularly interesting in this case is the pre-commit hook. As one might speculate, this scripts runs just before the commit action by Git and has access to Git objects.

The hook I’ve written, basically runs on all the file in the commit and runs astyle (Artistic style) against each of them.

astyle if a very cool command line tool that works on various platforms. It runs against a set rules describing how to do spacing, indentation and various other beautification stuff.
It then rewrites the original file with the fixed style.

You can grab the hook in Github.

Please feel free to fork and enhance it.

Possible improvements:
Currently astyle works on complete objects (files). I would prefer it will only work on the objects diff  in commits.


git pre-commit hook for code beautification

HOW TO SET LOCAL AOSP GERRIT SERVER – PART 3

Hi there.
This is the last post in the series of a local AOSP gerrit server setup.
In this post, We’ll finalize the configuration of Gerrit, add new branches for development and see how to maintain the setup.

In the last post, we’ve finished creating the project in Gerrit.
When we develop locally, we should work on our own branches. Basically, you choose a branch/tag that you want to use as a baseline and start working from there.
As we know, in Android, there are too many projects to do it by hand for each project.
Let’s see how we can do it for all of them in one command.

How to create a baseline

For that, we’ll use the following Gerrit command line: gerrit create-branch.
As we did before, we’ll apply this command inside a repo forall command, so our Gerrit command will be applied to all projects.

First, we need to decide on the baseline. For each release, Google releases a build code associated with a manifest branch. We’ll need that tag. build code / manifest branch pairs can be taken from here.

For this tutorial, we’ll take the following Lollipop build LMY48B, which suits Nexus 5 (Which I own).

According to google, the associated branch for it is: android-5.1.1_r3

Let us first init an empty repository with that branch, and of course, we’ll do it from our server.

repo init -u ssh://ramon@localhost:29418/android/platform/manifest -b android-5.1.1_r3

Great, don’t just do repo sync yet. we want to examine the manifest first.
Open the file .repo/manifests/default.xml

You should see the following lines in the beginning:

<remote name="aosp"
fetch=".." />
<default revision="refs/tags/android-5.1.1_r3"
remote="aosp"
sync-j="4" />

The default revision tells which tag to checkout for each project.

Let’s take the android-5.1.1_r3 tag and branch out of this tag to our own branch. This will be our baseline and we could push our changes directly to that branch.

To do so, let’s go back to the mirror on the server, we’ll need to do another repo batch command.

repo forall -c 'echo $REPO_PATH; ssh -p 29418 ramon@localhost gerrit create-branch android/$REPO_PATH my_baseline android-5.1.1_r3'

You should see sometimes the error message “fatal: invalid revision “android-5.1.1_r3“”. This is ok, it happens on project which don’t have the tag. This project are not included in the manifest we set our baseline on.

Now, when the new branches are let’s create our own manifest. We’ll go back to the place we initialized the repo.

This is a git repository, it’s actually a project, so let’s create our own branch.

git checkout -b my_manifest_branch

Edit default.xml

git add manifest.xml
git commit -m "My new manifest branch"


git push ssh://ramon@localhost:29418/android/platform/manifest HEAD:refs/for/my_baseline
Counting objects: 3, done.
Delta compression using up to 8 threads.
Compressing objects: 100% (2/2), done.
Writing objects: 100% (3/3), 341 bytes | 0 bytes/s, done.
Total 3 (delta 1), reused 0 (delta 0)
remote: Resolving deltas: 100% (1/1)
remote: Processing changes: new: 1, refs: 1, done
remote:
remote: New Changes:
remote: http://localhost:8080/36 Set Manifest for myself
remote:
To ssh://ramon@localhost:29418/android/platform/manifest
* [new branch] HEAD -> refs/for/my_baseline

Done. now, open gerrit and merge that change. From now on, people should init the repo like this:

repo init -u ssh://ramon@localhost:29418/android/platform/manifest -b my_baseline

Great.


How to update gerrit

Let’s see now how we can update our gerrit and mirror and get upstream changes from Google.

This is very easy. go to the mirror folder and just do

repo sync -j6

And now, run the batch script we ran before.

$ repo forall -c 'echo $REPO_PATH; git push ssh://ramon@localhost:29418/android/$REPO_PATH +refs/heads/* +refs/tags/*;'


How to set Gerrit as a system service

Our setup can’t be finished until we know for certain that after reboot our gerrit server will start again.

To achieve that, we need to add Gerrit as a system service. I’ll show here how to do it in Ubuntu server (Debian like), for other dists like please find another tutorial online.
Basically, gerrit can be easily be installed by chkconfig. problem is that chkconfig is no longer supported in Ubuntu, which now uses upstart for it’s init process.
The right way, is to write a new Gerrit config for upstart and place it in /etc/init
Couldn’t find a it on the net, so I need to write it myself.
When it will be ready, I’ll post it in the blog.

Meanwhile, here’s an ugly, working way to achieve that.

I’m assuming that Gerrit installation resides on /opt/gerrit-review

echo "GERRIT_SITE=/opt/gerrit-review" >> /etc/default/gerritcodereview
ln -snf /opt/gerrit-review/bin/gerrit.sh /etc/init.d/gerrit
update-rc.d gerrit defaults

HOW TO SET LOCAL AOSP GERRIT SERVER – PART 3

HOW TO SET LOCAL AOSP GERRIT SERVER – PART 2

Hi. This is part 2 of the “How to set local AOSP Gerrit server”, you might want to start with part 1 here.

In part 1 we’ve downloaded all the necessary stuff and in this post we’re going to set it all up.

First thing, let’s bootstrap Gerrit.

Let’s create a Gerrit user:

$ sudo adduser --system --shell /bin/bash --gecos 'Gerrit Code Review User' --group --disabled-password --home /home/gerrit2 gerrit2

Gerrit needs to work with a database, it support various types of database. for this tutorial I chose MySQL.
Open a shell and type the following:

$ mysql -u root -p
CREATE USER 'gerrit2'@'localhost' IDENTIFIED BY 'secret';
CREATE DATABASE reviewdb;
ALTER DATABASE reviewdb charset=latin1;
GRANT ALL ON reviewdb.* TO 'gerrit2'@'localhost';
FLUSH PRIVILEGES;
quit

This commands create a Gerrit user, a database and sets the required permissions for the Gerrit user.

Log in as the new user:
$ sudo su gerrit2

Copy the gerrit-2.11.war file you’ve downloaded in the previous post to gerrit2 home directory and run the following comand

$ java -jar ./gerrit-2.11.war init -d review_site

Using secure store: com.google.gerrit.server.securestore.DefaultSecureStore

*** Gerrit Code Review 2.11
***

Create ‘/home/gerrit2/review_site’ [Y/n]?

*** Git Repositories
***

Location of Git repositories [git]:

*** SQL Database
***

Database server type [h2]: MySQL

Gerrit Code Review is not shipped with MySQL Connector/J 5.1.21
** This library is required for your configuration. **
Download and install it now [Y/n]?
Downloading http://repo2.maven.org/maven2/mysql/mysql-connector-java/5.1.21/mysql-connector-java-5.1.21.jar … OK
Checksum mysql-connector-java-5.1.21.jar OK
Server hostname [localhost]:
Server port [(mysql default)]:
Database name [reviewdb]:
Database username [gerrit2]: gerrit2
gerrit’s password :
confirm password :

*** Index
***

Type [LUCENE/?]:

*** User Authentication
***

Authentication method [OPENID/?]:

*** Review Labels
***

Install Verified label [y/N]?

*** Email Delivery
***

SMTP server hostname [localhost]:
SMTP server port [(default)]:
SMTP encryption [NONE/?]:
SMTP username :

*** Container Process
***

Run as [gerrit2]:
Java runtime [/usr/lib/jvm/java-8-openjdk-amd64/jre]:
Copy gerrit-2.11.war to /home/gerrit2/review_site/bin/gerrit.war [Y/n]?
Copying gerrit-2.11.war to /home/gerrit2/review_site/bin/gerrit.war

*** SSH Daemon
***

Listen on address [*]:
Listen on port [29418]:

Gerrit Code Review is not shipped with Bouncy Castle Crypto SSL v151
If available, Gerrit can take advantage of features
in the library, but will also function without it.
Download and install it now [Y/n]?
Downloading http://www.bouncycastle.org/download/bcpkix-jdk15on-151.jar … OK
Checksum bcpkix-jdk15on-151.jar OK
Generating SSH host key … rsa… dsa… done

*** HTTP Daemon
***

Behind reverse proxy [y/N]?
Use SSL (https://) [y/N]?
Listen on address [*]:
Listen on port [8080]:
Canonical URL [http://ubuntu:8080/]: http://10.0.0.9:8080

*** Plugins
***

Installing plugins.
Install plugin download-commands version v2.11 [y/N]?
Install plugin reviewnotes version v2.11 [y/N]?
Install plugin singleusergroup version v2.11 [y/N]?
Install plugin replication version v2.11 [y/N]?
Install plugin commit-message-length-validator version v2.11 [y/N]?
Initializing plugins.
No plugins found with init steps.

Initialized /home/gerrit2/review_site
Executing /home/gerrit2/review_site/bin/gerrit.sh start
Starting Gerrit Code Review: OK
Waiting for server on ubuntu:8080 … OK
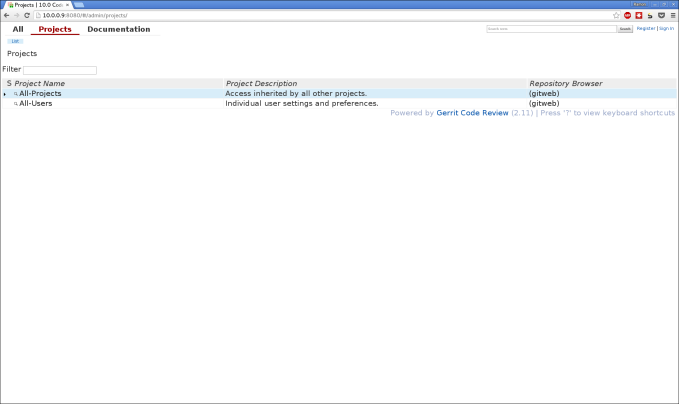
Opening http://10.0.0.9:8080/#/admin/projects/ …FAILED
Open Gerrit with a JavaScript capable browser:
http://10.0.0.9:8080/#/admin/projects/

Allright. We’ve got Gerrit running now.
A thing worth mentioning, the first user that logs into Gerrit becomes an admin. so make sure to login first with the administrator user.

Gerrit can work with several authentication models. I chose OpenID for this tutorial.
If you don’t have OpenID server on your machine, you can use external service such as Yahoo for instance. (Lately Google stopped supporting OpenID)

Let’s get started. open up a browser and browse to Gerrit site.

In the upper right corner you should see Register and Login links.
Register first using OpenID and log in.

Gerrit welcome screen

Now, let’s set our SSH keys so we can work from command line. we’re doing it as the Admin user for the Ubuntu Server, not as the Gerrit user.

Generate an SSH key pair by doing the following:

serveradmin@ubuntu:$ ssh-keygen <ENTER>
Generating public/private rsa key pair.
Enter file in which to save the key (/home/serveradmin/.ssh/id_rsa):  <ENTER>
Enter passphrase (empty for no passphrase): <ENTER>
Enter same passphrase again: <ENTER>
Your identification has been saved in /home/serveradmin/.ssh/id_rsa.
Your public key has been saved in /home/serveradmin/.ssh/id_rsa.pub.
The key fingerprint is:
d5:7b:51:d8:22:0e:95:63:f9:0e:a2:22:1c:97:76:40 serveradmin@ubuntu
The key's randomart image is:
+---[RSA 2048]----+
| .E ..o o.|
| . ..* o..|
| o .+.+.. |
| . + ... o... |
| . + .S. ..o. |
| o . . .. |
| . . |
| |
| |
+-----------------+

serveradmin@ubuntu:~/aosp_mirror$ cat ~/.ssh/id_rsa.pub  <ENTER>
ssh-rsa AAAAB3NzaC1yc2EAAAADAQABAAABAQDobCUbb8ExP9ci48ZCzCUE3P+IjoH6zrv/l88+4NOTf9FJWDAl4SHCXI+mrZoFEeZo9
uieKTuvHqUFQNpnVA9vfNY6bhaTucAAt0fX9Q1M1ZtNj2IxaQd7u9PnxjSGEig0BUtjqDEu4CMhMShXGWsGAwL7ju/qu7G7RF
iK/Wtcye6wUSjziXseCusb1DUZZ6dsOpxrPYEM3kwXpItQtAq1oEIQWsxEgj2nrOqRXm1UWdqIQU1X45XHQtg5iqi44PfLVNU
3alu453MeWn5PrpSS5dFw/7AkBW4KMPwrOvVnu8gb9xLA0TWtPf+sQ9ROEQC5SBeO+4Q9XRNf5YaswpLj serveradmin@ubuntu

Copy the entire blob to clipboard and paste switch back to Gerrit web interface.

On the upper right corner of the screen, click on your user name and then on Settings.
On the left menu that appears click on “SSH Public Keys” and paste the blob in the white box and press add.


Let’s test that we can access Gerrit now through SSH:

ssh -p 29418 admin@localhost <ENTER> <Change "admin" to your username in gerrit>

**** Welcome to Gerrit Code Review ****

Hi Administrator, you have successfully connected over SSH.

Unfortunately, interactive shells are disabled.
To clone a hosted Git repository, use:

git clone ssh://ramon@10.0.0.9:29418/REPOSITORY_NAME.git

Connection to localhost closed.

Now when we’re logged in. let’s create two groups:

“android-admin” and “android”

The former will be used for administration, it will have permissions to review, merge, delete, etc.
The latter will have only view and submit change-set permission.

On the menu, press on People –> Create New Group
Enter in group name “android-admin” (Without the quotes)

Do this again for “android”

Now, let’s create a parent project for all the AOSP tree. All configuration we apply to that project will be inherited to the children projects. if we skip this step, all AOSP projects will inherit from the default “All-Projects” project, which is too global.

On the Gerrit GUI, Press on Project -> Create New Project.
Fill in the following:

Project Name: Android
Rights Inherit From: All-Projects

Tick the “Only Serve As Parent For Other Projects” and press on “Create Project” button.

Now, when we’ve got our parent project. let’s set it’s access permissions:

Click on Projects -> List, and select the Android project.

Click on Access and Edit.


Now it’s time to push all Android projects to gerrit.

First command will create all the projects in gerrit. it should be rather quick.\
The Second command will change the parent project for all the projects we’ve just created.
The Third command will actually push all the code into the repositories, this should take a while…

Go into the folder where you’ve mirrored Android and type:
$ repo forall -c 'echo $REPO_PATH; ssh -p 29418 admin@localhost gerrit create-project --name android/$REPO_PATH --owner android;'

accessories/manifest
device/asus/deb
device/asus/flo
device/asus/flo-kernel
device/asus/fugu
device/asus/fugu-kernel

$ repo forall -c 'echo $REPO_PATH; ssh -p 29418 admin@localhost gerrit set-project-parent --parent Android android/$REPO_PATH;'

accessories/manifest
device/asus/deb
device/asus/flo
device/asus/flo-kernel

Go to Projects -> List
Select Android and Press on General.
Below on the page you should find a button called “Edit Config”
Press on it and paste the following:

[access "refs/*"]
read = group android
read = group android-admin
abandon = group android-admin
push = group android-admin
pushTag = group android-admin
pushSignedTag = group android-admin
label-Code-Review = -2..+2 group android-admin
submit = group android-admin
submitAs = group android-admin
forgeAuthor = group android-admin
forgeCommitter = group android-admin
pushMerge = group android-admin
rebase = group android-admin
editTopicName = group android-admin
[access "refs/heads/*"]
label-Code-Review = -2..+2 group android-admin
label-Code-Review = -1..+1 group android
read = group android
abandon = group android
rebase = group android
submit = group android
[access "refs/tags/*"]
pushTag = group android
pushSignedTag = group android

Press on Save.

In next step, which will take some time, we’re going to push all of git tags and objects to the projects we’ve created. It may fail, but if it is, you can run it again until it succeeds. I found that increasing the Virtual machine RAM solved the issue for me.


$ repo forall -c 'echo $REPO_PATH; git push ssh://ramon@localhost:29418/android/$REPO_PATH +refs/heads/* +refs/tags/*;'

Okay.
That’s it for this time, in the next part I’ll show you how to maintain the gerrit server. how to add it as a startup service, how to update the mirror and push new releases of Google in to it.
Cy’a

Ramon

Part 3 is ready, here’s the link.

HOW TO SET LOCAL AOSP GERRIT SERVER – PART 2

How to set local AOSP Gerrit server – Part 1

In this tutorial I’ll explain how to set a local gerrit server that hosts Android source code.

After completing the tutorial you’ll have a fully runnable local AOSP mirror with local Gerrit server.

First thing first. we need a Linux server. if you don’t have one available, you can use a pre-installed Ubuntu 15.04 Server I created – here.
Actually, this tutorial was tested on this machine, so you’re unlikely to get in trouble if you use that.

This tutorial assumes that package management is apt-get. If you’re using other, please do the appropriate adjustments.

Gerrit Prerequisites:

1. Java JDK > 1.7
2. Git
3. SSH server
4. DB

I choose to work with mySQL, put you can also work with various other DB software. consult the Gerrit documentation here.

Here is a short command to get you everything you need:

$ sudo apt-get install git openjdk-8-jre openssh-server mysql-server gitweb

Download and install Android repo

$ sudo curl https://storage.googleapis.com/git-repo-downloads/repo > /usr/bin/repo
$ sudo chmod a+x /usr/bin

Now we need to set a local mirror of Android. It will take a while, go do something else in the meanwhile…

$ mkdir -p /usr/local/aosp/mirror
$ cd /usr/local/aosp/mirror
$ repo init -u https://android.googlesource.com/mirror/manifest --mirror
$ repo sync

Download Gerrit.

You’re done with part one… Jump to part two of this tutorial

How to set local AOSP Gerrit server – Part 1

Ubuntu Server 15.04 Virtualbox Image

I created pre-installed Ubuntu Server 15.04 64bit Virtualbox image to be used for various server side setups.

It can be freely downloaded and used by you.
all packages were updated to the current date (9/5/15).
openssh server was installed and set to default port

File can be downloaded from here:

Link: UbuntuServer1504VboxImage.tar.bz2
MD5: eff64b08b8e2fc4ceb668a4e1a62b82d

The credentials are:
user: serveradmin
password: 123456

Please change the password immediately after you download the image for obvious security reasons.

You should change the following after booting

hostname (preset to “ubuntu”)
Date/Time (preset to Jerusalem – GMT+2)
Language / Keyboard setup (preset US English)

Notes:
1. Virtualbox Guest util is not installed.
2. The image was created with VirtualBox 4.3.26r98988
3. Audio / USB / serial port are disabled
4. HD size was set to 128GB, resized dynamically.

Ubuntu Server 15.04 Virtualbox Image

Linux Serviio start up script

I created my own Serviio service script, I’m sharing it for reference and free usage here.

If you don’t know Serviio and you need a Media Server in your home network, this is your best choice. check it out here.

Actually, you only need to alter “/etc/default/serviio” with your username and path to Serviio installation.

When you’re done with the scripts add it to rc using:

sudo update-rc.d serviio default

/etc/default/serviio


NAME="Serviio Media Server"
DAEMON="/opt/serviio/bin/serviio.sh"    ## Update this to point at serviio_root/bin/serviio.sh
SERVICE_ACCOUNT="nativeguru"            ## change to an appropriate username, DON'T RUN UNDER ROOT!

/etc/init.d/serviio

#! /bin/sh
### BEGIN INIT INFO
# Provides:          serviio
# Required-Start:    $local_fs $remote_fs $network $syslog 
# Required-Stop:     $local_fs $remote_fs $network $syslog
# Default-Start:     2 3 4 5
# Default-Stop:      0 1 6
# Short-Description: Serviio daemon script
# Description:       This file is a daemon script for Serviio to be
#                    placed in /etc/init.d.
### END INIT INFO

# Author: Ramon Fried <ramon.fried at gmail dot com>

# Do NOT "set -e"

# PATH should only include /usr/* if it runs after the mountnfs.sh script
PATH=/sbin:/usr/sbin:/bin:/usr/bin
DESC="Serviio Daemon"
NAME=serviio
DAEMON=/opt/serviio/bin/serviio.sh
DAEMON_ARGS=""
PIDFILE=/var/run/$NAME.pid
SCRIPTNAME=/etc/init.d/$NAME

# Exit if the package is not installed
[ -x "$DAEMON" ] || exit 0

# Exit if the default config file is missing
#[ -x /etc/default/$NAME ] || exit 0

# Read configuration variable file if it is present
[ -r /etc/default/$NAME ] && . /etc/default/$NAME

# Load the VERBOSE setting and other rcS variables
. /lib/init/vars.sh

# Define LSB log_* functions.
# Depend on lsb-base (>= 3.2-14) to ensure that this file is present
# and status_of_proc is working.
. /lib/lsb/init-functions

#
# Function that starts the daemon/service
#
do_start()
{
	# Return
	#   0 if daemon has been started
	#   1 if daemon was already running
	#   2 if daemon could not be started
	start-stop-daemon --start --quiet --pidfile $PIDFILE -c "${SERVICE_ACCOUNT}" --exec $DAEMON --test > /dev/null \
		|| return 1
	start-stop-daemon --start --quiet --pidfile $PIDFILE -m -b -c  "${SERVICE_ACCOUNT}" --exec $DAEMON -- \
		$DAEMON_ARGS \
		|| return 2
}

#
# Function that stops the daemon/service
#
do_stop()
{
	# Return
	#   0 if daemon has been stopped
	#   1 if daemon was already stopped
	#   2 if daemon could not be stopped
	#   other if a failure occurred
	start-stop-daemon --stop --quiet --retry=TERM/30/KILL/5 --pidfile $PIDFILE -c "${SERVICE_ACCOUNT}"
	RETVAL="$?"
	[ "$RETVAL" = 2 ] && return 2
	# Wait for children to finish too if this is a daemon that forks
	# and if the daemon is only ever run from this initscript.
	# If the above conditions are not satisfied then add some other code
	# that waits for the process to drop all resources that could be
	# needed by services started subsequently.  A last resort is to
	# sleep for some time.
	start-stop-daemon --stop --quiet --oknodo --retry=0/30/KILL/5 -c "${SERVICE_ACCOUNT}" --exec $DAEMON
	[ "$?" = 2 ] && return 2
	# Many daemons don't delete their pidfiles when they exit.
	rm -f $PIDFILE
	return "$RETVAL"
}

case "$1" in
  start)
	[ "$VERBOSE" != no ] && log_daemon_msg "Starting $DESC" "$NAME"
	do_start
	case "$?" in
		0|1) [ "$VERBOSE" != no ] && log_end_msg 0 ;;
		2) [ "$VERBOSE" != no ] && log_end_msg 1 ;;
	esac
	;;
  stop)
	[ "$VERBOSE" != no ] && log_daemon_msg "Stopping $DESC" "$NAME"
	do_stop
	case "$?" in
		0|1) [ "$VERBOSE" != no ] && log_end_msg 0 ;;
		2) [ "$VERBOSE" != no ] && log_end_msg 1 ;;
	esac
	;;
  status)
	status_of_proc -p $PIDFILE "$DAEMON" "$NAME" && exit 0 || exit $?
	;;
  restart)
	log_daemon_msg "Restarting $DESC" "$NAME"
	do_stop
	case "$?" in
	  0|1)
		do_start
		case "$?" in
			0) log_end_msg 0 ;;
			1) log_end_msg 1 ;; # Old process is still running
			*) log_end_msg 1 ;; # Failed to start
		esac
		;;
	  *)
		# Failed to stop
		log_end_msg 1
		;;
	esac
	;;
  *)
	echo "Usage: $SCRIPTNAME {start|stop|status|restart}" >&2
	exit 3
	;;
esac

:

Linux Serviio start up script